Drilling and cutting plexiglass canopies
Posted by Blake Frazier on
The following article is taken with permission from our friends at Airplane Plastics. Find the original article and their website here: https://www.airplaneplastics.com/faq
What is the proper technique for cutting a canopy?
Before you begin trimming your canopy trim the protective film back away from the line. Tape the edges down with clear packing tape, also tape any seams of the protective film. This will prevent acrylic chips and dust from getting under the film. An abrasive wheel powered by a drill, rotary tool, or a die grinder is recommended. Reciprocating saws like jigsaws or sabre saws are not recommended and will probably break your canopy. A tool that grinds the canopy is best. Mark your canopy with a grease pencil or a Sharpie. Allow the canopy to warm to room temperature. Don't allow the canopy to vibrate or chatter while cutting or it may chip or crack. Support your canopy so it will not twist or spread during trimming. Duct tape is handy to hold things in place. Cut slowly, do not push the cutter. Let the tool do the work. Use eye protection. Acrylic chips can be a problem in your eyes since they are clear and difficult to see. After the canopy is trimmed, use a hand-held belt sander (we prefer the 3"x18" 40-60 grit) to sand down to your line. De-burr the edge with a scraper or sandpaper before trial fitting to keep from breaking the canopy or cutting your fingers.

What is the proper technique for drilling?
When drilling acrylic, best results will be obtained using commercially available acrylic drill bits (Several test holes should be drilled in a scrap piece before drilling the canopy).
If the desired hole is larger than 3/16", drill with a plastic cutting drill bit first and then enlarge with the Unibit #2 (New styles should not be used to drill a 3/16" hole due to the aggressive nature of the SpeedPoint. See picture).

For holes larger than 3/8" different techniques can be used. Hole saws and two-flute Vortex router bits are a few options available.
For initial fitting, a standard HSS 3/32" bit can be used for drilling the canopy and the frame. Drill several practice holes in scrap pieces of acrylic to perfect these techniques before drilling your part. Back-up the canopy with a block of wood. Start with a slow speed and light pressure, then increase the speed and pressure. As the drill bit starts to go through the acrylic, reduce the speed and pressure so the drill bit goes through the acrylic slowly. Drill holes oversize to allow for motion caused by thermal expansion and contraction. Lightly de-burr the holes with a countersink we prefer the single flute style.
When precision countersinking is desired we recommend using a microstop.
DO NOT USE LOC-TITE. It crazes the acrylic.
If a commercially available acrylic drill bit is not available, then a High Speed Steel twist drill bit can be modified to work as shown in pictures to the right. Chuck the bit in an electric drill. Insert the bit through a wood or metal bushing clamped to the support rest of an abrasive wheel. The bushing must be clamped so that an approximate 60 degree total included angle is ground on the bit. With the electric drill operating, insert the bit through the bushing so that it contacts the face of the rotating abrasive wheel, thus grinding a conical point of the bit. Remove the bit from the chuck.

Using the side of the rotating abrasive wheel grind a zero rake angle on each of the cutting edges. This provides a scraping, rather than a cutting action.
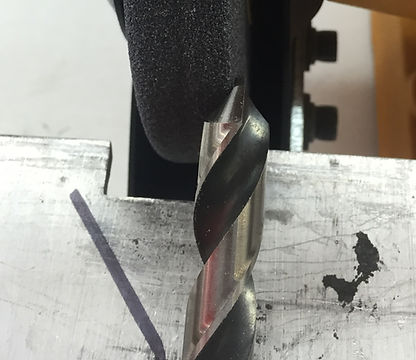
Then use the face of the rotating abrasive wheel to grind a clearance behind each of the cutting edges. Make sure to practice drilling holes with a finished bit in scrap pieces of acrylic

General drill speeds
Diameter Speed RPM
.060" 1500-4500
.125" 1500-4500
.187" 1500-4500
.250" 1500-2000
.312" 1500-2000
.375" 1500-2000
.437" 1000-1500
.500" 500-1000
.750" 500-800
1.000" 500